Sunday, September 18, 2011

Anna's Birthday Cake

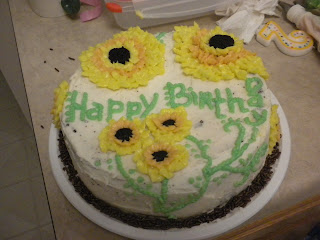
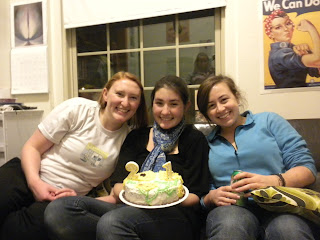
This post is WAY over-due. But I wanted to put it up anyway because it's about a birthday cake for someone who I adore and it was made with many other people who I also adore. Consider this take-1 of the sunflower cake that was made possible by Kaitlyn's artistry and our ability to make stuff up as we go along.

This was the first time we ever used, what is so far, my favorite chocolate cake recipe ever! Same as the last 2 blogs- http://www.foodandwine.com/recipes/double-chocolate-layer-cake.

We tried to make a meringue butter cream frosting from the "Bakers Field Guide to Cupcakes" but our Meringue fell so it was a bit weird. My amazing roommate Renee was able so salvage it enough for us to use it for the sunflowers. To cover the cake and as the filling we used the basic butter cream recipe (easy and delicious!).  

Harper and Brittany Working on the Meringue

Looks good so far!

Expert at cutting butter into small pieces

Mix Mix Mix

Oh Heyyyy Brittany

When things started to become a mess... 
Renee to the rescue!

Finally frosting!

Harper LOVES frosting : )

Kaitlyn doing the hard stuff and Brittany and Kate being..."supportive"


Focused

Almost done!

Finishing touches!

Happy 21st Birthday Anna!

Bringing a little sunshine to a rainy day

For this cake I used the same chocolate cake I made for the cake-ophony post. This time I cut off the tops of the 2 cakes (because they were uneven) and just did 2 layers with the evened out parts. I used pillsbury creamy vanilla frosting because I didn't have time to make my own and colored it green and yellow/orange for the design. This cake is very crumbly and moist so if you want to frost it but don't want the crumbs to show you need to do a crumb layer, refrigerate it, and then do another layer on top. I kind of like the cookies and cream look for this one. The flowers are made using Oreo cookies and I used wilton tip #352 for the petals on the flowers and #366 for the leaves. For the shell border I used what was left over from the petal frosting and used tip #21. 


Tuesday, August 9, 2011

cake-ophony

(the title of this blog comes compliments of the Faj)

Alright cake fans! This is by far the biggest project I have ever tackled. The goal, a two tiered birthday cake, lemon on top and chocolate on bottom with raspberry filling in both. The final designs were inspired by cakes seen on the charm city cakes website (credit where credit is due).


For the chocolate cakes I used the following recipe 
Chocolate Strawberry Layer Cake
Ingredients:
For the Cake:
1 ¾ cups all-purpose flour
2 cups granulated sugar
¾ cups unsweetened cocoa powder (natural)
1 ½ teaspoons baking powder
1 ½ teaspoons baking soda
1 teaspoon fine grain sea salt
2 large eggs
1 cup buttermilk (can use light)
½ cup vegetable oil
2 teaspoons pure vanilla extract
1 cup boiling water


Preparation:
1. Preheat oven to 350ºF. Butter the bottoms and sides of three 8-inch round cake pans. Line the bottom of each pan with a round piece of parchment paper.
2. In a large bowl, combine the flour, sugar, cocoa powder, baking powder, baking soda, and salt. Set aside.
3. In a medium bowl, whisk together the eggs, buttermilk, vegetable oil, and vanilla extract.
4. Add the egg mixture into the flour mixture; beat on medium speed for one minute (or combine by hand to prevent over-mixing). Whisk in the boiling water (the batter will become thin). Pour into prepared pans.
5. Bake 17-22 minutes, or until a cake tester (or a wooden toothpick) inserted into the center of each cake, comes out clean.
6. Once the cakes are out of the oven, with a [dry] clean oven mitt (preferably a cloth one), gently press down onto the cakes, to make them level (this will allow you to skip a whole step in trimming the cakes).
7. Cool cakes for 15 minutes in the freezer.

8. Remove cakes from pans, and place on wire racks.

(http://www.sophisticatedgourmet.com/2010/06/chocolate-strawberry-layer-cake/)--> There are also directions for frosting and filling on the original recipe but i just used the one for the cake part. 


Next, I made the lemon cakes--

Ingredients

  • Cooking Spray
  • Flour for dusting
  • 1 (1/2 pint) raspberries
  • 1 tablespoon sugar

Cake:

  • 2 1/3 cups cake flour
  • 1 1/2 teaspoons baking powder
  • 1/4 teaspoon baking soda
  • 1/2 teaspoon salt
  • 1/2 cup lowfat buttermilk
  • 1/3 cup vegetable oil
  • 1 tablespoon finely grated lemon zest
  • 2 tablespoons fresh lemon juice
  • 2 large eggs
  • 1 large egg white
  • 1 1/4 cups sugar

Directions


1. Preheat the oven to 325 degrees F. Spray 2 (8-inch) round cake pans with cooking spray. Dust lightly with flour and shake out the excess.

2. Reserve half of the raspberries, and combine the other half with 1 tablespoon sugar and crush with a fork. Set aside.

3. Sift together the flour, baking powder, baking soda, and salt in a medium bowl, stir with a fork to evenly combine the ingredients. In another bowl, whisk the buttermilk, oil, lemon zest, and lemon juice.

4. Whisk together eggs, egg whites and sugar in a large bowl and beat with an electric mixer on medium speed until it holds ribbons, about 2 minutes. Add the flour mixture in 3 parts, alternating with the buttermilk mixture in 2 parts, beginning and ending with the flour. Stir together by hand until evenly combined and no lumps remain.

5. Pour the batter evenly into the pans. Bake in the center of the oven until a cake tester comes out clean, about 30 minutes. Cool on a baking rack for 10 minutes, then turn the cakes out onto a baking rack to cool completely.


(Notes: I did set aside the raspberries at the beginning like it said, but ended up integrating the mixture into a different filling recipe later on. I only had one small pan so I had to bake the two cakes separately. I also bought a defective lemon zester that just caused lemon juice to squirt into my eye, needless to say I went forward with no lemon zest but it all worked out OK.)


Lemon cake #1, Chocolate Cake, Raspberry Sauce
Raspberry Filling Recipe--

Directions:

  1. In a small sauce pan, combined all of the ingredients and slowly bring to a boil over medium-high heat (keep stirring until thickened for best results).
  2. Let cool completely before spreading onto cake.
(http://www.food.com/recipe/raspberry-cake-filling-152347)-- I didn't have any lemon juice so I added 1 tsp of orange extract and 1.5 tbsp of water.


Once both of my lemon cakes were finished I used my cake leveler to flatten the tops and separate them into halves to fill them. I also prepared the icing I was going to use as the reservoir to keep the filling in and to frost the outside of the cake. 


White Icing Recipe-- (I don't usually like to use shortening, however it doesn't melt as quickly as butter icing and is a little easier to work with)

Ingredients

  • 4 cups confectioners' sugar
  • 1 cup shortening
  • 2 tablespoons water
  • 1 teaspoon clear imitation vanilla extract

Directions

  1. In a large bowl, combine sugar, shortening, water and vanilla. Beat on low speed to combine, then beat on medium speed for a full five minutes. It won't look like Icing at first, but keep the mixer going for a full five minutes, and then you're done!
  2. Note: If you're not using this for decorating, but just for icing the cake, thin the icing by adding 3 tbs. of corn syrup, or water to the icing. 
Building the lemon cake, you can see the other layers in the background ready to be added
The lemon cake was exceptionally easy to work with because the cake was sturdy and the icing recipe worked perfectly in between the layers and to spread around the outside of the cake. I used a 16" featherweight icing bag with decorating tip #789 (a wide flat tip that helps you cover the outside of the cake and then smooth the icing out with a spatula). This is the first time I have not had a problem with crumbs getting all over my frosting. 


THE CHOCOLATE CAKE

I realized quickly that these cakes were far too moist to hold up the weight of the full lemon cake so I abandoned the tiered cake idea. After a few frosting mishaps and a trip to the store to get more powdered sugar I was finally able to get a thin frosting that spread well around the whole cake. 


The frosting at this point was a bit melty


mended frosting, super looking cake
I'm posting the link to the chocolate icing recipe but take my word for it, DO NOT MELT THE SHORTENING! I did it, and it cooled into little tiny balls of shortening in the mix that wouldn't smooth out, I ended up having to reheat the entire recipe, cool it in the refrigerator and then add more shortening to thicken it up. I made a second recipe because I didn't have enough and by not melting the shortening it turned out great. 


(http://www.cdkitchen.com/recipes/recs/356/ChocolateFrosting67535.shtml)

DECORATING
  
To decorate my lemon cake I wanted to cover it in fondant flowers. I made white, blue and yellow fondant/gum paste mixtures and cut out medium flowers and small flowers from stencils to mix and match the colors. I created their shapes by pressing them with the ball tool into a thick sponge and then cooling them in the fridge to dry them out and help them hold their shape. Small flowers were attached to the centers using a gum paste glue (a little bit of gum paste dissolved in water and applied with a paintbrush). Flowers were then attached to the lemon cake with dots of frosting applied to the bottom of the flower and then pressed gently to the cake. 


I stored both cakes in the fridge over night and the chocolate cake icing wasn't as smooth as I would have liked it so I used my leftover homemade chocolate frosting (and yes, a little store bought) to smooth out the edges, Then I taught myself how to make ribbons of fondant into flowers. 


re-frosted

combined two colors of blue ribbons and used gum paste adhesive


Pretty darn close!
The blue flowers were just a simple direct fold-over and the pink flowers were more of a twist (they kind of reminded me of the shapes of those campaign ribbons). To make the darker and lighter colors I just took 1/2 of what was left over from the lemon cake and added more gel dye. I used a fondant cutter with 1/4" separators on it to standardize the ribbon size and the middle "buttons" was plan white fondant balled up and squished. (Note: Make a little more fondant than you'll think you're going to need so you don't end up having to mix more and trying to match your colors. I had to make more yellow on the first cake because I ran out and it was quite a drag. Also cool all fondant pieces in the fridge for a bit so they firm up and will hold their shape better). As a finishing touch I made some green fondant/gum paste and make some stems and leaves for the flowers, I was nervous about that design feature but it turned out great. 


15 hours of work--> some excellent looking cakes. What do you think?


Do they look like Duff's cakes?


http://www.charmcitycakes.com/images/cakesfortwo/Flowers_large.jpg


http://www.charmcitycakes.com/images/cakesfortwo/Ribbon-Flowers_large.jpg


Happy Birthday to Us!  
Happy Eating to You!

Thursday, August 4, 2011

Flowers For Your Thoughts

Tonight was the first night of my second Wilton Class "Flowers and Cake Design". Unlike the first class we don't have to put nearly as much energy into making icing of the right consistency or having the hand steady enough to make the designs. We created a 50/50 mixture of Gel Paste and Fondant to start out with. The fondant can be used to color the gel paste and the gel paste makes the mixture pliable and prevents the fondant from breaking so easily.

We all made some flowers of different colors so we could mix and match for a nicer looking end result. We rolled out the fondant at a 1/8 and inch and fit it into a flower press. Super simple!!!

  
The "Button Flower"

Next, we made Pansy's. Again we rolled out our gum paste/fondant mixture but this time cut it out with a blossom shape. Using the thinner of our two sponges we used our ball tool to thin out the edges of the petals, then on the thick sponge we pressed the petals in to create a 3 dimensional look. We pressed out more blossoms of a different color and cut the petals apart. Using the same thinning/pressing technique we used two petals as accents for each flower, attaching them to the base with gum glue adhesive (a combo of gum paste and water, applied with a paintbrush). The finishing touch was a small loop of gum paste/fondant in the center of the flower, also attached with gum glue.
Sponges and Ball Tool
1st Attempt- The white mold underneath gives the flower it's shape while it dries
Ran out of yellow petals, turned out nice anyway

The last day of this class we will be combining all of the flowers we will make over the next couple of weeks onto a final cake. I'm looking forward to seeing the final result. In the meantime, I'll practice.


Happy Eating!

Tuesday, July 26, 2011

Roses are...orange

...violets are blue, I defrosted cupcakes and redecorated them for you!

Today was the last day of my beginner cake decorating class. As we were away all weekend biking our butts off at the Courage Classic I had zero time to bake or make frosting. Thus...I bought store made cupcakes and frosting. Unfortunately they didn't have any unfrosted cupcakes available, so I had to start off by defrosting them.

This is what they looked like leaving the store, cute, but not cute enough 

We learned how to make roses today and we also learned this really cool technique called "striping the bag" where you put a stripe of coloring gel in the bag and then put your frosting in (careful not to disturb your line) and then when it comes out, there's a stripe in whatever design you make.

To make "Ribbon roses" you start with two bags of stiff consistency icing. You use one for your base which you'll make in a pyramid shape with Wilton tip 12. The second bag (the one where I used the striping technique) has Wilton tip 104 and it's used to create the petals of the rose. We made the roses on this little platform thing (gosh I can't think of the name of it) but you're able to spin it around as you squeeze your icing bag making it easier to make flowers (as opposed to moving your hand around). I made an orange striped bag for my rose petals and used plain white icing for the base. My roses definitely improved with practice.


Attempt 1
2- got a bit morphed


3-Good, but needs a tighter center (don't we all!)
4- getting the hang of it!
5


6- I love that orange stripe effect!

After creating the roses on wax paper squares using the flower pedestal things we used little scissors to move them. Bringing the blades of the scissors together under the rose we'd scoop part way underneath the flower, lift it, and then using a spatula, push it onto the cake/cupcake we were working on. For the leaves I used a thin consistency icing colored green with tip 352. The finished products looked something like this...


I feel like I could have put them back on the shelf at safeway!


Thanks for reading! Happy Eating!